Using your own domain name for your blog on Blogger makes your website look more professional and easier for visitors to remember. Connecting Blogger to your own domain name not only enhances your branding but also gives you more control over your online presence. In this article, we will learn how to connect Blogger to your own domain name in a simple and effective way.
Preparation Before Connecting Domain Name
Before you start connecting your domain to Blogger, you need to prepare:
- A registered domain name: You can register a domain name from service providers like Namecheap, GoDaddy, or Google Domains.
- Access to your domain’s DNS management panel: This is where you’ll set up DNS records to connect your domain to Blogger.
How to Connect Blogger to Your Own Domain Name
Here are the specific steps to connect Blogger to your own domain name:
- Go to Blogger and go to Settings: Log in to Blogger, select the blog you want to connect to your custom domain, and go to “Settings”.
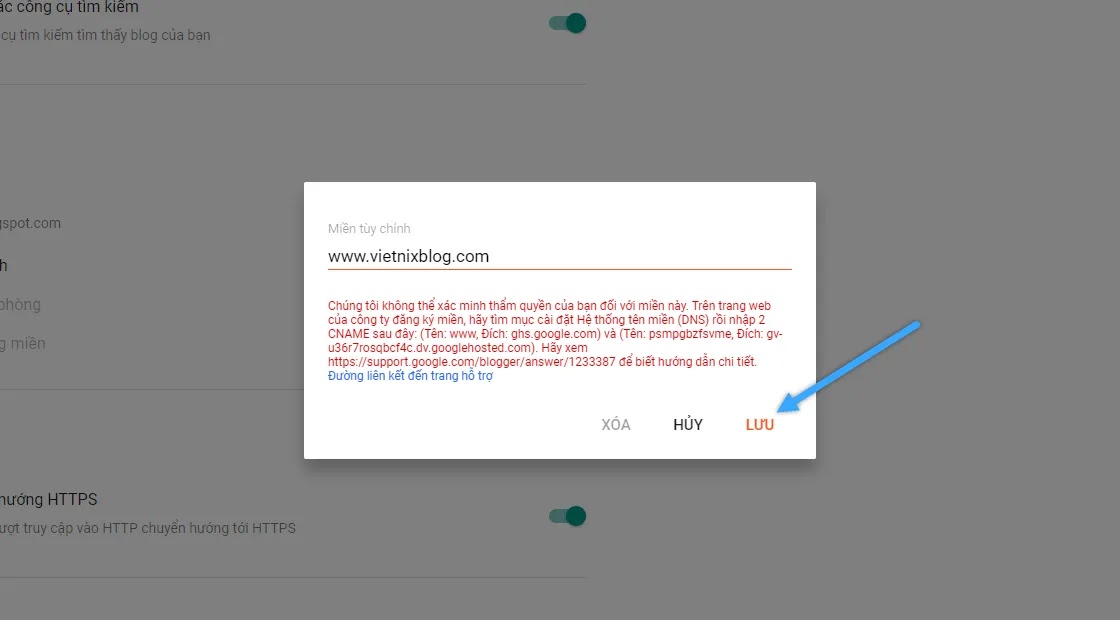
- Add custom domain: In the “Custom Domain” section, click “Set up a third-party domain.” Enter your domain name, including the “www” (for example, www.example.com), and click “Save.”
- Get CNAME and A records from Blogger: After clicking “Save,” Blogger will display an error and provide you with the two CNAME records you need to set up. Make a note of these records or leave this page open so you can copy them later.
- Access the domain name’s DNS management: Log in to your domain provider account (where you purchased your domain name) and look for DNS management or DNS settings.
- Add CNAME record: In DNS management, add two CNAME records provided by Blogger:
- First CNAME record: Points from “www” to “ghs.google.com”.
- Second CNAME record: Is a unique, encrypted string provided by Blogger, pointing to a corresponding string.
- Add A record: To ensure that your domain works without “www”, add 4 A records with the following IP addresses:
- 216.239.32.21
- 216.239.34.21
- 216.239.36.21
- 216.239.38.21
- Save changes: After adding the DNS records, save the changes in your domain management control panel.
- Go back to Blogger and save the settings: Go back to the custom domain settings page in Blogger and click “Save”. This process can take a few minutes to a few hours for the DNS to fully update.

Verify Connection and Check Domain Name
Once set up, test your domain name by typing your new domain name into your browser. If everything is set up correctly, your blog should appear on your new domain name. Sometimes DNS updates can take up to 48 hours, so if you don’t see a change right away, be patient.
Set Up Redirection From Non-www To www
To ensure that visitors to your domain with or without the “www” are redirected to the correct page, you should set up a non-www to www redirect. In your Blogger custom domain settings, select the “Redirect example.com to www.example.com” checkbox. This ensures that people will always access your blog correctly.
Notes When Connecting Domain Names With Blogger
- Check DNS errors: If you get an error after setting up your domain, double check your DNS records and make sure they were entered correctly.
- Waiting for DNS update time: DNS updates can take anywhere from a few minutes to 48 hours. Please be patient and check back later.
- Domain Security: Make sure you enable privacy protection for your domain to avoid abuse or theft.
Custom Domain Name
Connecting Blogger to your custom domain name is an important step to make your website more professional and memorable. By following the detailed instructions above, you can easily set up a custom domain name for your blog on Blogger. This will not only improve your brand image but also make a better impression on your visitors. Hopefully, this guide will help you successfully connect your custom domain name to Blogger. Good luck!

